Resto project: N7

You can talk about anything here. You'll also find a section with member posted photos of our events here.

Moderator: Committee Members

Post Reply
User avatar
Rob Bell
Committee Member
Posts: 14425
Joined: Tue Oct 02, 2007 2:36 pm
MGF Register Region: South East
Model of Car: MGF 1.8i + MGF Shed!

Resto project: N7

Post by Rob Bell » Mon Jan 06, 2020 6:19 pm

There's a silver lining for every cloud - and so it emerged this new year when I discovered that someone had left a hole in the fabric roof of my MG (a 1995 build car that I bought new in January 1996 and have lovingly abused ever since):

IMG_4133.JPG
They even left a present on the passenger seat, no doubt delivered through that newly made "slot":

IMG_4134.JPG

Obviously, the metropolitan police have more pressing concerns than vehicle vandalism where there wasn't a selfie taken with the perpetrator caught red handed but I reported it anyway (another statistic) and will sort this out myself.

The discovery was made on the day that I had booked N7 for a new set of tyres. I've not been a great fan of the Toyo T1Rs and have decided to fit a full set of Michelin Pilot Sport 3s (205/45 R16); I'd have gone for Pilot Sport 4s, but the choice now available on 16" rims is now extremely limited - and the only PS4 has 50 section rubber that will likely foul the wheel arch lips. Far too early to say how good they are, but from the short drive back home, no concerns regarding abnormal handling characteristics.

The plan had been to get N7 ready for the sprint season - and allow me more time to work on Project Shed (there are big plans for the car, and not enough time to do them ahead of the 2020 season) - but these may change depending on how far the scope of the re-fresh now extends (you'll start to understand why in a moment).

The refresh was to tackle the following jobs:
1. Sort out all the water leaks (there is now a much larger one to contend with - the passenger seat is absolutely sodden wet thanks to that new "ventilation" hole in the roof!
2. Repair/replace the passenger side window + both window alignments (relates to leaks mentioned above).
3. Replace heater airbox (again, relates to leaks above).
4. Replace all four Hydragas spheres with re-gassed replacements (I'll need to swap the shortened displacers from the current 'spheres to the replacements)
5. Remove dent from passenger door (Yummy Mummy damage I think - no insurance details left, obvs) - I have replacement passenger door in case
6. Replace dent from passenger front wing - this wing will likely need replacing - I have a replacement, but it needs painting.
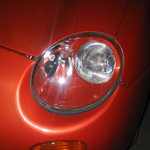
7. Replace headlamps - I have a pair of remanufactured replacements to fit - the ones currently on the car will be swapped over to Project Shed - it's lights are genuinely terrifyingly dreadful... and the ones on N7 are actually not too bad!
8. Replace light bulb in clock (this sort of thing annoys me intensely!)
9. Swap rear rotors for standard items (I have VHS rear discs, but they are not standard class compliant, so will be removed for now)
10. Fit Yellow stuff rear pads, change front rotors and AP brake pads (old and worn - needs doing)
11. Change brake fluid (I use DOT 4.1).
12. Sort out tracking (misaligned steering wheel is another pet hate).


With new tyres fitted, and with a soaking wet passenger seat, I had all the justification I needed to remove most of the interior, bring the seats indoors to dry, remove the carpets and the stinky sound deadening and review the state of the floor pan.
IMG_4149.JPG
IMG_4151.JPG
Things did not look too bad with the sound deadening still in place. However the rear under carpet section and even the front under carpet sound deadening was wet, and on the passenger side, absolutely sodden :(

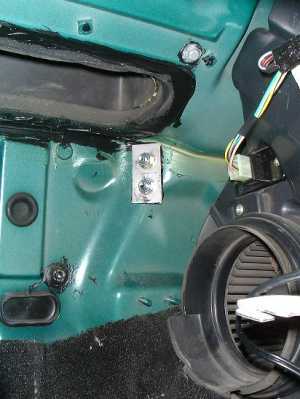
The true horror was only revealed on removing the sound deadening:
IMG_4152.JPG
I thought I had taken pictures of the floor pan too - but they appear to have disappeared? The floor pans had extensive surface corrosion, but all things considered, not as dreadful as it could have been. But they make Project Shed's interior look pristine in comparison! The advantage of no carpets perhaps?

The rear bulkhead panel was dreadful. It hadn't perforated (at least not yet), but the lower edge is frilly and a couple of the screw bolt heads had largely disappeared through rot. Nice. Luckily I was able to remove all of them and got the panel free. I'm now on the look out for a good replacement...
IMG_4177 (2).JPG

User avatar
Rob Bell
Committee Member
Posts: 14425
Joined: Tue Oct 02, 2007 2:36 pm
MGF Register Region: South East
Model of Car: MGF 1.8i + MGF Shed!

Re: Resto project: N7

Post by Rob Bell » Mon Jan 06, 2020 6:32 pm

Annoyingly, three of the metal gromets in the floor have also rotted out. This is the driver's side rear item below - it disintegrated when I started to clean things up with a wire brush on my cordless drill... I guess that will mean that water can at least escape now... :roll:
IMG_4175.JPG
So the silver lining following the vandalism?

This hood was a temporary replacement I fitted some while ago after a rear window cracked (I had this in my garage if memory serves), but it never fitted particularly well, never stowed easily and had multiple wear holes. The rear screen was fine though. In other words, if I ever "wanted" a hood vandalised, I would shed the least amount of tears over this one being damaged. The rear screen is serviceable and salvageable. I'll likely remove it from the frame and keep it spare. I've found a reasonable replacement for 78 quid off eBay - it'll do the job and I'll not be too precious about this one either.

The principal silver lining is the fact that it led me to strip the interior and find rot before it truly got out of hand. Thank goodness! The only downer is the rear bulkhead panel I salvaged from the parts car all those years ago, although looking generally a lot better than the one I removed from N7, does have a perforation in it! Grrr. :rant:

The next task is to source replacement sound deadening material (I plan to use closed-cell foam, which won't retain water like the original), clear the floor pans of rust, treat the rust and re-paint the floors, thoroughly clean the carpets, and fit a new roof.

I'll take this opportunity to sort the door, the passenger window, see if I can't (finally!) crack the black art of window alignment, replace the heater box with a TF snorkel, re-fit the seats and then move on to more mechanical things...

The really big restoration on this car will likely be in a year or so's time, when I finally get the body work properly restored and repainted... But the process has now started - which is a great feeling! :thumbsu:

J334
Posts: 68
Joined: Thu Mar 13, 2014 1:07 pm
MGF Register Region: South Wales
Model of Car: MGTF 135 2003

Re: Resto project: N7

Post by J334 » Mon Jan 06, 2020 7:27 pm

Blimey makes you wonder what's lurking unseen under carpets etc!

Worth just taking a look every so often.

nickmitchell38
Posts: 107
Joined: Sat Jan 31, 2015 10:37 pm
MGF Register Region: Essex
Model of Car: MY VVC
Location: Romford

Re: Resto project: N7

Post by nickmitchell38 » Mon Jan 06, 2020 11:13 pm

Hi Rob, I think I have a spare tank cover panel if you want it, I'm in Romford

User avatar
Charless
Posts: 2364
Joined: Tue Oct 09, 2007 1:52 pm
MGF Register Region: South Coast
Model of Car: 96 Mpi, 99 VVC
Location: Chilbolton

Re: Resto project: N7

Post by Charless » Tue Jan 07, 2020 7:22 am

I have a fairly good '95 HAM VVC shell in Thruxton should you be down this way. It will be cubed in about a month after external body parts have been 'donated'.

User avatar
Rob Bell
Committee Member
Posts: 14425
Joined: Tue Oct 02, 2007 2:36 pm
MGF Register Region: South East
Model of Car: MGF 1.8i + MGF Shed!

Re: Resto project: N7

Post by Rob Bell » Tue Jan 07, 2020 10:07 am

J334 wrote:
Mon Jan 06, 2020 7:27 pm
Blimey makes you wonder what's lurking unseen under carpets etc!

Worth just taking a look every so often.
It certainly is - and particularly so if the carpets get damp. The area behind the seats is easily neglected, and as you can see, the damp wicks up the rear bulkhead sound deadening to rot the lower half of this panel which is zinc coated but not painted from the factory.
nickmitchell38 wrote:
Mon Jan 06, 2020 11:13 pm
Hi Rob, I think I have a spare tank cover panel if you want it, I'm in Romford
If it is re-usable Nick, I'd be very interested! I have found one for sale, but having problems with their website...
Charless wrote:
Tue Jan 07, 2020 7:22 am
I have a fairly good '95 HAM VVC shell in Thruxton should you be down this way. It will be cubed in about a month after external body parts have been 'donated'.
I shall pop in Charles! Been ages since I last saw you and need to drop off those Hydragas spheres to you. :D Has it got decent floor pan plugs?

nickmitchell38
Posts: 107
Joined: Sat Jan 31, 2015 10:37 pm
MGF Register Region: Essex
Model of Car: MY VVC
Location: Romford

Re: Resto project: N7

Post by nickmitchell38 » Tue Jan 07, 2020 2:53 pm

This one is FOC, just needs collecting

User avatar
Rob Bell
Committee Member
Posts: 14425
Joined: Tue Oct 02, 2007 2:36 pm
MGF Register Region: South East
Model of Car: MGF 1.8i + MGF Shed!

Re: Resto project: N7

Post by Rob Bell » Tue Jan 07, 2020 5:44 pm

nickmitchell38 wrote:
Tue Jan 07, 2020 2:53 pm
This one is FOC, just needs collecting
:thumbsu: Just sent you a pm Nick :D

User avatar
Charless
Posts: 2364
Joined: Tue Oct 09, 2007 1:52 pm
MGF Register Region: South Coast
Model of Car: 96 Mpi, 99 VVC
Location: Chilbolton

Re: Resto project: N7

Post by Charless » Tue Jan 07, 2020 7:06 pm

I haven't delved that far Rob but they are yours for the taking wmp if good enough; bring your own Torx50(?) for the seats then tuck in. I think it is all dry in there and the outer bodywork and original paint job is in fantastic condition so the bulkhead is probably better than yours too! I will be swapping out the boot, bonnet and two doors for my HAM one, maybe even the Mk1 hood which has lurked in a garage or more likely under a hardtop - no scissor marks. It also came with good Falken 914s all round on refurbed 5-spoke wheels. A huge bonus was 4 spheres with nitrogen charging valves fitted - but not Ian and Dawn Kennedy's style.

I only went to the yard for a wiper motor but ended up with a nearly complete car on a tow truck with sameday free delivery to my bodywork chap. Quite an expensive wiper motor in some ways - but the daily drive should be looking pretty fine for MGF25!
I'll get the chocolate hobnobs in....

User avatar
Mykel
Regional Rep
Posts: 2759
Joined: Thu Dec 30, 2010 8:13 pm
MGF Register Region: Europe
Model of Car: MG TF Monogram
Location: Schwalmtal, NRW, Germany

Re: Resto project: N7

Post by Mykel » Tue Jan 07, 2020 11:29 pm

Charless wrote:
Tue Jan 07, 2020 7:06 pm
I only went to the yard for a wiper motor but ended up with a nearly complete car …
Haven’t we all been there before? 8-) :lol:
MGTF:
2004 TF 135 in Monogram Spectre, black leather, RHD
MGZR:
2001 ZR 160 in Solar Red, LHD, LPG conv
Classic:
1972 MG Midget MkIII RWA in Blaze Red
MGF Register regional rep for Germany -- germany@mgfregister.org

User avatar
Rob Bell
Committee Member
Posts: 14425
Joined: Tue Oct 02, 2007 2:36 pm
MGF Register Region: South East
Model of Car: MGF 1.8i + MGF Shed!

Re: Resto project: N7

Post by Rob Bell » Wed Jan 08, 2020 9:38 am

Mykel wrote:
Tue Jan 07, 2020 11:29 pm
Charless wrote:
Tue Jan 07, 2020 7:06 pm
I only went to the yard for a wiper motor but ended up with a nearly complete car …
Haven’t we all been there before? 8-) :lol:
I couldn't possibly say... :lol:

Thanks Charles - there may be some really useful bits and bobs left on the car, so I'll bring a tool kit with me :thumbsu:

User avatar
Rob Bell
Committee Member
Posts: 14425
Joined: Tue Oct 02, 2007 2:36 pm
MGF Register Region: South East
Model of Car: MGF 1.8i + MGF Shed!

Re: Resto project: N7

Post by Rob Bell » Mon Jan 13, 2020 4:12 pm

Had a busy weekend - ‘‘twas taken up a bit by birthday parties etc, but yesterday collected a secondhand roof and a replacement bulkhead panel - the latter from Nick. It’s entirely serviceable - just the lightest of surface rust, so couldn’t be happier with it! Cheers Nick :thumbsu:

By the time I got home on Sunday, the light was failing again, so didn’t get much done. I’ll post some more pictures later when I get a better internet signal.

The summary is that the heater inlet leak is more of a torrent: the passenger side floor pan had filled with water despite the car being footed with a Mike Satur hood cover! The heater box removal and re-seal is now a major priority.

In other news, some closed cell foam based sound deadening has arrived. Unlike the fabric fibre stuff, it won’t retain water, so hopefully I won’t get the same problem with waterlogged carpets in the future, even if water manages to get in (which if get the sealing right, it won’t)...

More soon!

User avatar
Rob Bell
Committee Member
Posts: 14425
Joined: Tue Oct 02, 2007 2:36 pm
MGF Register Region: South East
Model of Car: MGF 1.8i + MGF Shed!

Re: Resto project: N7

Post by Rob Bell » Tue Jan 14, 2020 4:48 pm

As promised: evidence of the leaky misery in my MGF!
IMG_4194_LI.jpg
This is the passenger foot well. I've crudely drawn in some green arrows to reveal where water has been dripping into the car, past the heater inlet box on the bulkhead. Given that it had been over 36 hours since the last rain, I was surprised to see such obvious water marks!!! So yes, priority now is to re-seal/ replace the heater box with a TF heater air intake snorkel. Mykel previously advised using non-drying mastic - this sounds extremely sensible advice, and I'll be following it! :thumbsu:

Here's the pool of water in the rear of the floor pan (the car is parked on my drive at the moment, which has a mild slope, with the rear of the car parked lowest):
IMG_4192.JPG
MGF based aquarium anyone? :roll:

The sheet metal of the floor pan has rust pox - this is after removing all the loose stuff with a wire wheel on an electric drill. It's all surface rust fortunately:
IMG_4196.JPG
So I've tried to deal with this using a flap wheel on a grinder:
IMG_4197.JPG
I also decided to remove the rotten remnants of the floor pan bungs - they appear to have been "glued" in place with seam sealer:
IMG_4197.JPG
IMG_4198.JPG
IMG_4199.JPG
The flap wheel made light work of these :)

When the light completely failed, I needed to seal the metal surface (water still entering the car until I've sorted the weather proofing). I used a handy can of black smoothrite to do this:
IMG_4200.JPG
This should protect the now exposed metal for now - and I'll undertake a more complete re-paint once I've removed all the remaining rust.

This project is a bit like watching paint dry, but I don't want this getting "too exciting" by having to cut out and replace rot - which luckily hasn't been necessary so far!

User avatar
Rob Bell
Committee Member
Posts: 14425
Joined: Tue Oct 02, 2007 2:36 pm
MGF Register Region: South East
Model of Car: MGF 1.8i + MGF Shed!

Re: Resto project: N7

Post by Rob Bell » Mon Jan 20, 2020 11:33 am

Having splashed some smoothrite on the floor pan last weekend, I was very keen to make progress and resolve the first long-term water leak issue - the leaking heater box.

I say chronic - well this is not my first rodeo with respect to airbox leaks: http://mgf.ultimatemg.com/group1/info/j ... Feb%201999

Image

This was repaired by the Rover dealership in 1999:

Image
More here: http://mgf.ultimatemg.com/group2/common ... carpet.htm

I guess the repair lasted nearly 10 years (?) but clearly I had a massive problem now - and likely a massive problem for some significant period of time judging by the surface corrosion. :roll:

First an inspection. From the under-bonnet area, there was a clear gap in the airbox seal between the bulk head panel and the airbox:
IMG_4221.JPG
From the inside, the earlier silicone repair had clearly failed:
IMG_4222.JPG
IMG_4223.JPG
The next step was to remove the old heater box. This is removed by two screws from inside the car (the rearmost ones on the 'box) and two outside - located under the bulkhead panel flange. Three came out fine. One put up a bit of a struggle, but after a bit of a battle it eventually came out.

It isn't in best shape, leaving much of the remnants of the original seal stuck with silicone to the bulkhead panel.
IMG_4224.JPG
IMG_4225.JPG
IMG_4226.JPG
I had to scrape off the silicone and grunge from the panel (I used a plastic scraper) and things started to look a little better :D
IMG_4227.JPG
I was replacing this with a "Snorkel" air intake from the later TF - a couple of reasons for this, most of these reasons irrelevant to making the car water tight, but the original airbox didn't look nice enough to put back in! I was very fortunate to have a TF snorkel complete with the six mounting screws. They have a broad shoulder to locate the plastic moulding, that then tapers down to an M6 thread. This matches the captive nuts in the bulkhead panel that are used for the pedal box in LHD application and are otherwise un-used in the MGF application. The front three have no captive nuts - just 10mm holes in the flange section of the bulkhead panel. To remove the need to grub around with washers and non-captive nuts, I inserted M6 Rivnuts (the Rivnut tool was kindly brought to me by Santa! :D ):
IMG_4228.JPG
As the Snorkel was second hand, the backing foam was compressed and flat - and I ran the risk of the assembly leaking again. To negate this, I applied non-setting mastic to the foam seal and screwed down the Snorkel. Looking good, and hopefully a good seal and now water tight!
IMG_4229.JPG

User avatar
Rob Bell
Committee Member
Posts: 14425
Joined: Tue Oct 02, 2007 2:36 pm
MGF Register Region: South East
Model of Car: MGF 1.8i + MGF Shed!

Re: Resto project: N7

Post by Rob Bell » Mon Jan 20, 2020 11:33 am

Has anyone noticed anything odd about the under bonnet appearance of my car's bulkhead? ;)

User avatar
Rob Bell
Committee Member
Posts: 14425
Joined: Tue Oct 02, 2007 2:36 pm
MGF Register Region: South East
Model of Car: MGF 1.8i + MGF Shed!

Re: Resto project: N7

Post by Rob Bell » Mon Jan 20, 2020 11:41 am

The next job was to clean the carpets that had been drying indoors for a couple of weeks. Happily they are bone dry now. And because they're cheap plastic, they've not rotted either. There are some minor tears - but nothing to get upset about at this stage, and they tell an ownership story of the car... including such things as holes for screws from where I had previously mounted the fire extinguisher for sprints and hill climbs (shown in picture below - likely circa 1999):
Image

Inevitably, the passenger carpet was by far and a way the worst, green with some plant life that had found damp conditions to their liking. Sadly (!) I forget to take a picture of this grossness. Here's half way through, with the passenger carpet mostly cleaned, the driver's side just looking like 25 year old car carpet.
IMG_4230.JPG
A lot of elbow grease, vacuuming and using a stiff brush (I found a copper wire brush very good), I got the foot well carpets looking like this:
IMG_4231.JPG
I've also cleaned the bulkhead carpet (I haven't taken a picture of this).

So far, so good. :)

User avatar
Rob Bell
Committee Member
Posts: 14425
Joined: Tue Oct 02, 2007 2:36 pm
MGF Register Region: South East
Model of Car: MGF 1.8i + MGF Shed!

Re: Resto project: N7

Post by Rob Bell » Mon Jan 20, 2020 12:54 pm

I've also made a start to making new sound-deadening out of the close-cell foam purchased from the Bay-of-fleas. I've not taken pictures of this yet, and have the challenge of working out how to reproduce a triangular section of foam with 70mm length sides... Hmmm

User avatar
Rob Bell
Committee Member
Posts: 14425
Joined: Tue Oct 02, 2007 2:36 pm
MGF Register Region: South East
Model of Car: MGF 1.8i + MGF Shed!

Re: Resto project: N7

Post by Rob Bell » Mon Jan 20, 2020 1:14 pm

The next day was time to sort out the second, more recent cause of major water leak: the slashed roof. A reminder of the 150mm slash left in the roof over Christmas:

Image

As mentioned previously, I bought a cheap second hand roof off everyone's favourite auction site. It's cheap for a reason (that I'll explain later), but it'll do for now. With the T-bar out of the way, it is easy to remove the old hood and replace with the "new" - two screws either side of the cabin, and the 7 rear deck clips.
IMG_4250.JPG
It's a bit faded, but I have some colour restorer on order, so hopefully I can make it look a little more tidy.
Cheap for a reason? One reason that was declared by the vendor was a patch repair on the roof (you can just make it out in the picture above) - and this makes "good" a hole in the fabric. It's not attractive, but hopefully weather resistant. I drive with the roof down all the time, so not too much of a problem and only noticeable when parked with the roof up. The other reason, and this one was not declared (the vendors may or may not have known), is that the rear window is an aftermarket replacement item. It's fit is central without any obvious creases, but it hasn't been fitted correctly and is under too much tension with the roof clamped closed. I'm not holding much hope for its long term longevity.

Having said all that, the frame on this replacement roof is infinitely better than the one I've just removed - it opens and closes smoothly without binding. What a joy! When the opportunity arises or is forced upon me, I'll recover this frame with a fresh canvass item. I have one in storage somewhere (if only I could remember where! :lol:)

With that water leak issue solved, I was going to turn to the windows, but left that for the moment and decided to finish removing rust and repainting the floor pans.

Yes, there had been some residual water left inside, but I had sponged this out the previous evening. Suspiciously, there was still damp on the rear of the passenger floor pan, particularly around the seams adjacent to the centre tunnel:
IMG_4246.JPG

To dry things properly, I decided to apply a heat gun. This was interesting, because it was clear that moisture was trapped between metal seams: I'd dry the area and then damp would re-emerge at the seam where metal flanges overlaid the floor pan and, where the metal was hot, would turn to steam. I persisted with this approach for a while (trying not to trip any residual paint off with the heat gun!) and hopefully I have everything dry now. Why? Because after removing as much of the rust bubbles as possible, I sprayed all the rust spots with more black smoothrite. I don't want to have trapped residual moisture by the fresh paint.
IMG_4251.JPG
Next, I de-rusted the fuel tank rear bulkhead panel that I got from Nick and again sprayed some smoothrite on the affected areas to keep the ferrous worms at bay. I was able to salvage all but three of the original panel retaining screws, and luckily I was able to replace three rotten screws with ones that I had salvaged from my parts car 10 years ago :D [rare justification for hoarding all those parts! :lol: ]
IMG_4253.JPG
Final discovery of the day wasn't really a discovery but rather something I'd forgotten about - the rear deck sound deadening pad is disintegrating from the many times it has been taken out and put back for work on the engine. I shall be making my own replacement.
IMG_4248.JPG
By the way, does anyone have a TF rear deck carpet going spare? The MGF carpet was never really compatible with the X-Power roll hoops I fitted to my car over 15 years ago - I'll have a look on the usual auction sites to see whether I can find one...

The next task will be replacing the passenger side window and seeing whether I can finally master the black art of MGF window alignment (ha ha! dream on...)

ErikB
Regional Rep
Posts: 544
Joined: Fri Oct 12, 2007 11:12 am
MGF Register Region: Europe
Model of Car: MGF PTP RT-Sport 165
Location: Belgium
Contact:

Re: Resto project: N7

Post by ErikB » Mon Jan 20, 2020 2:00 pm

So happy N7 gets the love she deserves. I hope to see her in full glory at MGF25.

User avatar
Rob Bell
Committee Member
Posts: 14425
Joined: Tue Oct 02, 2007 2:36 pm
MGF Register Region: South East
Model of Car: MGF 1.8i + MGF Shed!

Re: Resto project: N7

Post by Rob Bell » Mon Jan 20, 2020 3:28 pm

I hope so too Erik - it really needs a complete respray. Actually, I'd like to give the subframes a complete rebuild - but that will have to wait for a while until I get Project Shed V2.0 ready... ;)

Not yet sure which MGF will come to MGF25. Perhaps both if I can sort the logistics...

Post Reply