Project Swamp
Moderator: Committee Members
Forum rules
Not many rules really, this board being aimed at technical issues, it shouldn't fall foul (hopefully) of some of the more personal issues that can affect forums.
Rule 1 - Is that you need to think very carefully before posting anything technical or asking anything technical relating to the security system of the car - See 'Security Issues' sticky for more info.
Rule 2 - We (MGF Register) do not support copyright infringement and therefore references to CD ROM, PDF versions or paper copies of the workshop manual (for instance) should not be posted on the forum. We don't want to get into trouble and we'd rather sell you a genuine hard copy through our Regalia shop anyway!
Because advice is honestly and freely given in this technical section, much of it will be amateur experienced based, so any information is given in good faith and is not guaranteed as correct.
-
RobboMC

- Posts: 1061
- Joined: Wed May 09, 2012 1:36 am
- MGF Register Region: Eastern Australia
- Model of Car: 1999 Mpi
Re: Project Swamp
Finally found some time to replace the bent adjusting bolt in the rear control arm. I've put it next to a straight edge to show the bend in it. New one fitted and now off to the wheel alignment shop.
MG Sydney had these bolts in stock! This one seemed a little too easy.
MG Sydney had these bolts in stock! This one seemed a little too easy.
-
RobboMC
- Posts: 1061
- Joined: Wed May 09, 2012 1:36 am
- MGF Register Region: Eastern Australia
- Model of Car: 1999 Mpi
Re: Project Swamp
The oil leak was coming from the driveshaft at the gearbox! The lower engine mount ( the one that bolts on to the sump ) had snapped.
Well one side was clearly a fatigue crack, the other was the overload tearing at the remaining metal.
Fortunately I was able to get home in one piece, and even more fortunately I have a good mate with a MIG welder in his garage,
so the total cost of the repair was a 1/2 litre of 75W/80 gearbox oil and a 6 point socket to get the tight bolts off. Don't even think about
attacking these bolts with anything less, I was rounding the heads with a ring spanner they were so tight. I hate to think how far the whole thing was moving under acceleration ( I could feel a definite vibration ) as the shaft was starting to exit the gearbox spline.
There must have been a slight vibration coming from this loose mount, now the car is wonderfully smoother.
Well one side was clearly a fatigue crack, the other was the overload tearing at the remaining metal.
so the total cost of the repair was a 1/2 litre of 75W/80 gearbox oil and a 6 point socket to get the tight bolts off. Don't even think about
attacking these bolts with anything less, I was rounding the heads with a ring spanner they were so tight. I hate to think how far the whole thing was moving under acceleration ( I could feel a definite vibration ) as the shaft was starting to exit the gearbox spline.
There must have been a slight vibration coming from this loose mount, now the car is wonderfully smoother.
-
RobboMC
- Posts: 1061
- Joined: Wed May 09, 2012 1:36 am
- MGF Register Region: Eastern Australia
- Model of Car: 1999 Mpi
Re: Project Swamp
A year has passed and a bit more, time for 1st service, and finally that new coolant. Two marvellous days in my swamp.
Day 1.- changed engine oil, greased suspension, checked all 8 brake pads (looking for trouble but found none), pumped up one side of Hydragas to 370 mm, then promptly had the seals fail in my hand pump. Rotate wheels front to back (195/50 all round so can do this) wear on rear tyres about twice the rate of fronts in past year. Prob the way I drive!
Source pump O Rings and repair pump.
Day 2. - drain coolant, refill and bleed, and bleed again. Careful check found split in alternator belt, source new belt, fit new belt. Wash brake dust off wheels, shine tyres, change tyre pressures after rotation, pump up other side of Hydragas to 370mm.

Car is now ready for another year of enjoyment.
The 'list' is getting shorter, I need to do that EPAS reset thing and then its only cosmetic things like seat leather and paint scratch.
Day 1.- changed engine oil, greased suspension, checked all 8 brake pads (looking for trouble but found none), pumped up one side of Hydragas to 370 mm, then promptly had the seals fail in my hand pump. Rotate wheels front to back (195/50 all round so can do this) wear on rear tyres about twice the rate of fronts in past year. Prob the way I drive!
Source pump O Rings and repair pump.
Day 2. - drain coolant, refill and bleed, and bleed again. Careful check found split in alternator belt, source new belt, fit new belt. Wash brake dust off wheels, shine tyres, change tyre pressures after rotation, pump up other side of Hydragas to 370mm.
Car is now ready for another year of enjoyment.
The 'list' is getting shorter, I need to do that EPAS reset thing and then its only cosmetic things like seat leather and paint scratch.
-
RobboMC
- Posts: 1061
- Joined: Wed May 09, 2012 1:36 am
- MGF Register Region: Eastern Australia
- Model of Car: 1999 Mpi
Re: Project Swamp
Julie took the car to NSW 2nd largest city and back on an express motorway run this week.
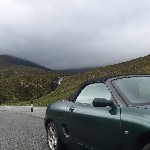
I was extremely hesitant about her taking it on her own. The road between Sydney and Newcastle is multi-lane motorway all the way,
and just last week 2 truck drivers got it wrong at 70 mph and the resulting mess closed the road for 24 hours while they cleared it up.
Some of the road ain't straight and ain't flat either. If you break down in the wrong place on this road you can be in serious strife.
Here's a nice link showing the rock walls and high bridges on this road:
http://www.ozroads.com.au/NSW/Freeways/ ... ycreek.JPG
http://www.dailytelegraph.com.au/newslo ... 62765a4841
It's 75 miles from outskirts to outskirts ( the speed limit is 110 km/h ( 69 mph ) all the way and she came home non stop in a time I'm not
prepared to publish! Considering how many clips and hoses have been removed and replaced I am now almost prepared to call the car reliable.
Last edited by RobboMC on Tue Feb 21, 2017 1:35 am, edited 2 times in total.
-
talkingcars
- Posts: 5771
- Joined: Tue Mar 09, 2010 10:44 pm
- MGF Register Region: South East
- Model of Car: mk1 VVC
- Location: West Sussex
- Contact:
Re: Project Swamp
Wikipedia does not have an article with this exact name.
Home to black Alfa 159 3.2 V6 Q4, blue MGZR160, green MGF VVC and grey MGF 1.8i, and red MG Maestro T16.
MGF chatting on the Register and at http://www.the-t-bar.com
MGF chatting on the Register and at http://www.the-t-bar.com
-
RobboMC
- Posts: 1061
- Joined: Wed May 09, 2012 1:36 am
- MGF Register Region: Eastern Australia
- Model of Car: 1999 Mpi
Re: Project Swamp
Seems the forum doesn't like links containing the # symbol,talkingcars wrote:Wikipedia does not have an article with this exact name.
I have put in a link to a different photo, showing the same sort of thing.
-
RobboMC
- Posts: 1061
- Joined: Wed May 09, 2012 1:36 am
- MGF Register Region: Eastern Australia
- Model of Car: 1999 Mpi
Re: Project Swamp
Where does the time go, 24 months since I posted about my Project.
Investigated a poor headlight: started with changing the bulb,
discovered all F's have this issue with the sealed beam going milky,
then discovered I have the headlights from a post-2001 trophy.
Some dork must have felt black and red looked nice together.
I have managed to source a complete set of silver lined headlights and orange blinkers to return
the car to the original look. So removed from bumper for the 3rd time, getting good at it now.
Found the 2nd hand headlight shells had some breakages, so ended up disassembling and rebuilding
from the best parts. I guess I'm not the first to be doing this.
Decided it was time to attack the back screen, so armed myself with a rivet gun got the local upholstery guy
to replace with new perspex, pretty happy with the job in the end.
Started chasing an oil leak coming from the lower front end of the engine,
replaced the front crankshaft seal twice then found out about crankcase pressure.
So found out about these little mesh filter things and gave them a great clean in degreaser;
and cleaned out all the pipes and drill holes.
I don't know if this was the root cause of the oil leak or not, but the car does run noticeably smoother
since I carried out the cleaning.
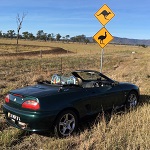
Decided a 20 year old spare tyre was a bad idea in such a large country, so sourced a new one,
a Falken in the correct size. Somewhere along the line I wore out the PO's tyres, and now the car
sports a set of Falken's in the correct 185/205 - 55 front to rear sizes. I must say this has totally transformed the car
from being decidedly tail happy to very much neutral approaching the handling limits.
Oh and I also broke the rear sump mounting on a decent long country drive, but managed to limp home.
A good mate who does know what he's doing welded the bracket back together for me.
Almost time to set out onto the track!
Investigated a poor headlight: started with changing the bulb,
discovered all F's have this issue with the sealed beam going milky,
then discovered I have the headlights from a post-2001 trophy.
Some dork must have felt black and red looked nice together.
I have managed to source a complete set of silver lined headlights and orange blinkers to return
the car to the original look. So removed from bumper for the 3rd time, getting good at it now.
Found the 2nd hand headlight shells had some breakages, so ended up disassembling and rebuilding
from the best parts. I guess I'm not the first to be doing this.
Decided it was time to attack the back screen, so armed myself with a rivet gun got the local upholstery guy
to replace with new perspex, pretty happy with the job in the end.
Started chasing an oil leak coming from the lower front end of the engine,
replaced the front crankshaft seal twice then found out about crankcase pressure.
and cleaned out all the pipes and drill holes.
I don't know if this was the root cause of the oil leak or not, but the car does run noticeably smoother
since I carried out the cleaning.
Decided a 20 year old spare tyre was a bad idea in such a large country, so sourced a new one,
a Falken in the correct size. Somewhere along the line I wore out the PO's tyres, and now the car
sports a set of Falken's in the correct 185/205 - 55 front to rear sizes. I must say this has totally transformed the car
from being decidedly tail happy to very much neutral approaching the handling limits.
Oh and I also broke the rear sump mounting on a decent long country drive, but managed to limp home.
Almost time to set out onto the track!
-
Rob Bell

- Committee Member
- Posts: 14438
- Joined: Tue Oct 02, 2007 2:36 pm
- MGF Register Region: South East
- Model of Car: MGF 1.8i + MGF Shed!
Re: Project Swamp
Nice update! Oil leak now gone?
-
RobboMC
- Posts: 1061
- Joined: Wed May 09, 2012 1:36 am
- MGF Register Region: Eastern Australia
- Model of Car: 1999 Mpi
Re: Project Swamp
I still have the slightest trickle behind the belt tensioner ( A/C version out here ) 
I'm pulling the oil filter elbow off this weekend but after that I'm stumped about where it could be coming from
down the exhaust side of the engine.
Definately not from the oil pump, its trickling down the block right beside the filter elbow.
At least the timing belt seems clean and dry so it's more of an inconvenience than anything else.
-
Rob Bell
- Committee Member
- Posts: 14438
- Joined: Tue Oct 02, 2007 2:36 pm
- MGF Register Region: South East
- Model of Car: MGF 1.8i + MGF Shed!
Re: Project Swamp
Head gasket or cam cover gasket? The latter is more likely - but there should be a tell-tail stain trail to follow?
-
RobboMC
- Posts: 1061
- Joined: Wed May 09, 2012 1:36 am
- MGF Register Region: Eastern Australia
- Model of Car: 1999 Mpi
Re: Project Swamp
The wrecking gods brought me a flame red bonnet and another headlight for the damaged one.
So we replaced the bonnet and gave it a good wash and polish. Not perfect, has a couple of small stone chips but no scratches or dents like the original one. Also got a replacement console as the old one had some snapped clips; and a new clock that keeps proper time.
Then is was off to the MG National Meeting in Queensland, a mere 950 km away. For a car that's never been more than 100 km from home this was a very anxious trip, however I had some support in the form of a couple of other club members.
Here I am at registration:
and at the concourse ( bonnet popped open for the judges )
and at the motorkhana
Then of course there was the 950 km trip home, achieved in one single day.
Over the course of the entire week, of some 2300 km including navigation rally, motorkhana and the return journey the car performed perfectly,
the only time I opened the bonnet was to jump start someone's tow car.
It's still weeping the odd drip of oil but nothing needed topping up for the whole journey.
And what a return journey it was, a most enjoyable trip.
So we replaced the bonnet and gave it a good wash and polish. Not perfect, has a couple of small stone chips but no scratches or dents like the original one. Also got a replacement console as the old one had some snapped clips; and a new clock that keeps proper time.
Then is was off to the MG National Meeting in Queensland, a mere 950 km away. For a car that's never been more than 100 km from home this was a very anxious trip, however I had some support in the form of a couple of other club members.
Here I am at registration:
Then of course there was the 950 km trip home, achieved in one single day.
Over the course of the entire week, of some 2300 km including navigation rally, motorkhana and the return journey the car performed perfectly,
the only time I opened the bonnet was to jump start someone's tow car.
It's still weeping the odd drip of oil but nothing needed topping up for the whole journey.
And what a return journey it was, a most enjoyable trip.
-
RobboMC
- Posts: 1061
- Joined: Wed May 09, 2012 1:36 am
- MGF Register Region: Eastern Australia
- Model of Car: 1999 Mpi
Re: Project Swamp
And here's some action from the motokhana
https://photos.app.goo.gl/CtUFx1aYuYd5HrC46
Yes, my skills needed some brushing up, this was my first motorkhana ever and my first go at this course,
my second run was a lot quicker.
https://photos.app.goo.gl/CtUFx1aYuYd5HrC46
Yes, my skills needed some brushing up, this was my first motorkhana ever and my first go at this course,
my second run was a lot quicker.
-
Rob Bell
- Committee Member
- Posts: 14438
- Joined: Tue Oct 02, 2007 2:36 pm
- MGF Register Region: South East
- Model of Car: MGF 1.8i + MGF Shed!
Re: Project Swamp
Great stuff! 
-
RobboMC
- Posts: 1061
- Joined: Wed May 09, 2012 1:36 am
- MGF Register Region: Eastern Australia
- Model of Car: 1999 Mpi
Re: Project Swamp
Pulled the timing belt cover off last night and had a good look around.
No significant oil inside the upper timing belt, but oil stains everywhere from the join between upper and lower belt covers downwards.
Fortunately the timing belt looks quite clean.
So perhaps the oil is running down the back of the upper cover from the cam seals????
and getting into the lower timing area that way.
Or perhaps the end of the cam ladder is leaking into there?????
I guess it will be obvious when I remove the rear belt cover.
-
Rob Bell
- Committee Member
- Posts: 14438
- Joined: Tue Oct 02, 2007 2:36 pm
- MGF Register Region: South East
- Model of Car: MGF 1.8i + MGF Shed!
Re: Project Swamp
Could be either, you're right. My money is on the cam seals - and hopefully this is the case, because it's the easiest problem to fix
-
Swampy
- Posts: 147
- Joined: Thu May 24, 2012 7:56 am
- MGF Register Region: Eastern Australia
- Model of Car: 1998 MGF VVC
- Location: Gold Coast, Queensland
Re: Project Swamp
“Then it was off to the MG National Meeting in Queensland, a mere 950Km away.”
Queensland, the Sunshine State - where it rained for a lot of the National Meeting weekend
It was great to finally meet after conversing through this site for years, even though I wasn’t able to compete.
Queensland, the Sunshine State - where it rained for a lot of the National Meeting weekend
It was great to finally meet after conversing through this site for years, even though I wasn’t able to compete.
Green 1998 MGF VVC road/track car (Green machine)
Blue 1998 MGF VVC garden ornament (to be a track car - Smurfette)
Blue 1998 MGF VVC garden ornament (to be a track car - Smurfette)
-
RobboMC
- Posts: 1061
- Joined: Wed May 09, 2012 1:36 am
- MGF Register Region: Eastern Australia
- Model of Car: 1999 Mpi
Re: Project Swamp
Rob Bell wrote:Could be either, you're right. My money is on the cam seals - and hopefully this is the case, because it's the easiest problem to fix
Rob, your 'money' was on the correct problem, timing end exhaust side cam seal was oily black and leaking down the outside of the rear belt cover.
So new seals, cam cover gasket for good measure; another timing belt, but I'm getting damn good at fitting timing belts now.
Found a few new tricks, like using a ring spanner to tighten the tensioner bolt, and standing behind the rear bumper to tighten the pillar bolts.
So all back together for another season.
-
Rob Bell
- Committee Member
- Posts: 14438
- Joined: Tue Oct 02, 2007 2:36 pm
- MGF Register Region: South East
- Model of Car: MGF 1.8i + MGF Shed!
Re: Project Swamp
That's good news!
I need to replace the cam belt on the 'Shed. Oddly, I've changed cam belts on other cars, and on the Shed, but only when the subframe and engine was out of the car! How would you recommend removing the engine mount?
I need to replace the cam belt on the 'Shed. Oddly, I've changed cam belts on other cars, and on the Shed, but only when the subframe and engine was out of the car! How would you recommend removing the engine mount?
-
RobboMC
- Posts: 1061
- Joined: Wed May 09, 2012 1:36 am
- MGF Register Region: Eastern Australia
- Model of Car: 1999 Mpi
Re: Project Swamp
Don't. Seriously you don't need to.
It is possible ( on a standard road car anyway ) to wiggle the belt between the engine pillar mount and the support bracket.
Then wiggle it between the engine and the support rail. I know because I did it last weekend.
All I have ever done is remove the pillar bolts and lower the engine. I found that then the cam locking tool fouls the pillar support, so it's best
to remove the locking tool. ( I wouldn't recommend that to most people, but Rob I know you can easily reset the cam timing properly. ) The wiggle trick is possible with the locking tool in place but it's a lot more difficult.
Once the engine is lowered 2-3 cm; wiggle the old belt out and the new one in, then jack up engine.
Replacement is the reversal of the removal procedure!
I find it's generally better to set the belt tension with the engine lowered from the pillar mount as it's easier to view the tensioner setting up through the wheel arch. ( Assuming you have an auto tensioner like me ) So jack up the engine, set the cam timing and fit the locking tool, fit the belt, somewhat tension the belt, then lower the engine and set the belt tension properly, then jack up the engine and fit and tighten the pillar bolts.
Also for what it's worth, I fitted a new tensioner bolt. For the lousy 2.5 quid it cost it's cheap insurance. However with the upper cover in place I don't think the bolt can come out, but if it ever comes loose, well you know what's going to happen. And I use a 6 point socket on the bolt, not a 12 point one.
-
Rob Bell
- Committee Member
- Posts: 14438
- Joined: Tue Oct 02, 2007 2:36 pm
- MGF Register Region: South East
- Model of Car: MGF 1.8i + MGF Shed!
Re: Project Swamp
Thanks - I like that suggestion a lot Rob: the idea of removing the whole engine mount wasn't filling me with joy... and I thought that there must be an easier work-through than that!